-- Throttle Body (TB) is the fuel and air intake controller of a petrol engine
-- With new sensor and ECU technology this is slightly complex area (for some), yet we clean it very often
-- Of many people I interviewed almost everyone has either replaced a sensor or has had serious idling issues
If u want to know how it works ... how to save your sensors and how to remove various idling issues ... please read this
i will explain with a lot of details and pics so that someone who has never known throttle body may also understand but some portions may be un-necessary which u may skip
( NOTE : TB design varies for different cars i cannot cover all .. just giving a basic concept here )
Location in engine
-- it connected at one end to your air-cleaner assembly and on the other to the in-take housing as shown in the pic below
Parts of TB which need to be understood for maintenance and adjustment
There is a diagram of TB below. Following is the list i will discuss in detail just keep refering to this diagram when reading ahead;
-- Accelerator Linkage (it has an idle adjustment screw not visible here ).. right most item in diagram
-- The air-cleaner side ... marked as 10
-- Hot water pipes ... 40
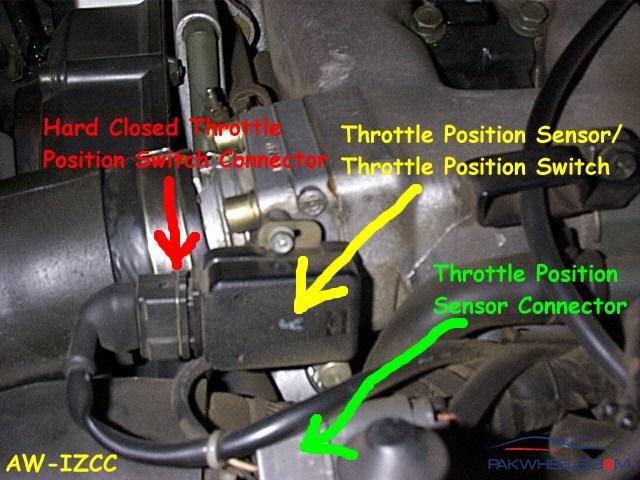
-- TPS (throttle position sensor) ... 20
-- IACV (Idle air controller valve) other names include ISC (idle servo controller) and Auto-choke .. 70
-- A housing with its seal or gasket .. 57 is the gasket
Parts wise explanation and adjustment
.. Accelerator Linkage it has two main parts which u need to understand
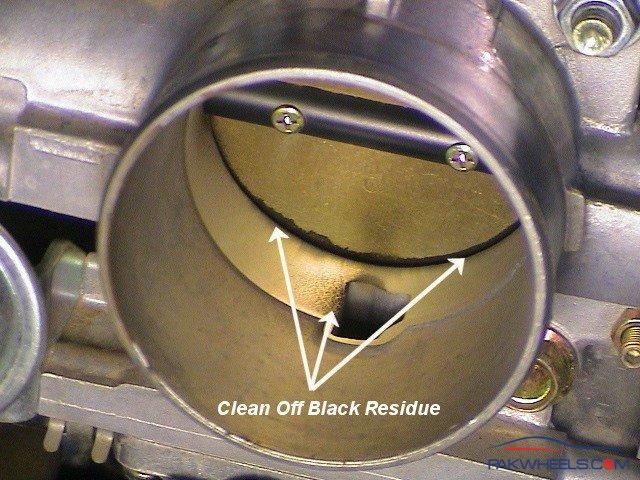
-- butterfly ..
[INDENT=2]--
Function : it controls amount of air and when u press accelerator it moves
[/INDENT]
[INDENT=2]--
Problems : general problems include being stuck and/or not sealing the pipe like housing completely
--
Symptoms : Jerky pickups and increased idle RPM
--
maintenance : is to completely clean it with petrol and remove carbon sludge
[/INDENT]
[INDENT]--
idle adjustment : Just a simple screw to adjust idle
BUT this adjustment comes after the basic adjustment of idle from TPS and IACV (explained ahead) .. for minor adjustments use this screw .. generally it has a lock nut as well
[/INDENT]
.. Air Cleaner side or housing .. just to give u an orientation of TB location in engine
.. Hot water pipes .. these are the source of temperature for auto-choke, early morning start races up ur idle till water attains certain temperature (around 70 degrees centigrade)
.. TPS : The most important item which causes major idling issues, it[INDENT]-- Working : has a linkage (generally a black plastic) which sits in a housing, the housing replicates the movement of butterfly and in turn gives a position identification to ECU (the main computer unit) that what is the position of butterfly at any point in time
--Construction : In general it is a simple variable resistance which changes value due to movement of its mechanical linkage .. the voltage coming ang going out of it varies from 1v to 5v which tell ECU the position of butterfly (or accelerator pressed)
-- Sub-Parts
[/INDENT]
[INDENT=2]-- linkage : plastic flat body .. it sometimes sits in a window like shape in TB housing be sure it is vertical or fits the window properly (this is important, the main issues start here, any)
-- Adjustable screw and/or spring : TPS gives the primary signal of throttle position if it is wrong, everything else will remain messed up ... there is a process to set it, explained bellow:
[/INDENT]
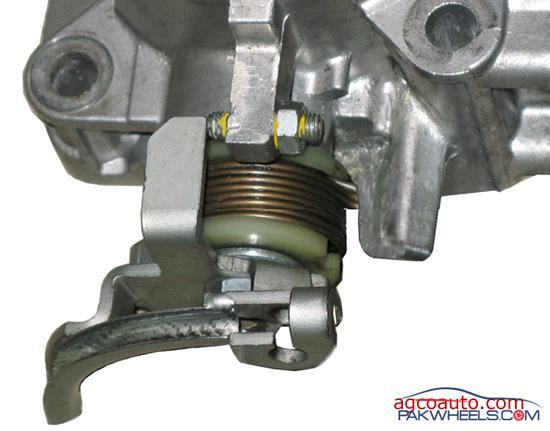
[INDENT=3]Adjustment process
-- When engine is running .. remove IACV connector (ur idle will reduce ..just normal)
-- not adjust the TPS screw or play (as shown in pic below) so that idle is 400-500 rpm (for non-rpm car where engine vibrates and will stall if lowered) .. use the idle screw in the accelerator linkage to achieve this level
-- now connect IACV and you'll get perfect idle of 800-850 RPM

WHY : the IACV or auto-choke controls rpm within a certain limit for some reason if u have set to 2500 rpm (from TPS) then either u'll get a eratic idle or a stalling behaviour .. general problem when a mechanic opens, cleans and fits it back not knowing that its play is also an adjustment
[/INDENT]
.. IACV :
-- Function : It gets reading from TPS and senses water temperature to accelerate the RPM when required, general these include
[INDENT=2]-- turning ON ac
-- Cold start
-- Other electrical load like power steering turning, operating head-lights, defogger, etc
-- Atmospheric requirements like air is thin in hilly areas[/INDENT]
[INDENT]--
Construction : It is a stepper motor which works in steps in accordance with voltage applied. Like telescopic rod it pushed butterfly forward to increase the RPM. The step in normal condition are around 10-15 and with AC ON can be up to 100 or 125 (its max limit)
--
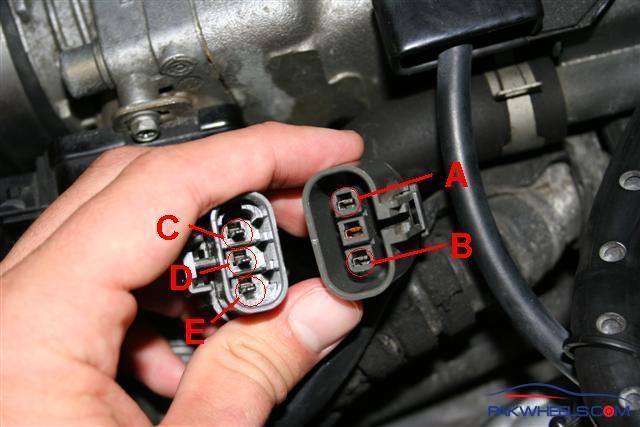
Checking a Faulty IACV : remove connector when engine is start ur rpm should vary. still not sure, remove IACV from housing put ur finger on sensor tip an just turn ignition key (do not start) and it will expand, the telescope pod will move forward .. turn off key and it will retract with a delay of about 2 seconds, third check is resistance generaly it is around 30-40 ohms in between it pins from centre pins to outwards
 Problems
 : RPM not increasing when required (as given in its functions) and eratic RPM (too high or too low) in noral condition, this involves basic idle setting as explained in TPS above
[/INDENT]
-- Housing : this is where water accumulates, the only problem u get here is an expanded seal when ur mechanic cleans it with petrol and when fitting back it doesn't sit back properly creating a leakage

WARNINGS :
-- never clean sensors with a brush there tips are carbon quoted and either they will give error in reading or will eventually die if this practice is followed. Mechanics put them in a tub of petrol and clean with a brush
-- use only prescribed sprays or solutions to clean sensor. My study suggests an elecrtonic circuit cleaner spray only. just spray and then put in the open for half an hour to dry nothing more
-- don't mess with idle adjustment of TPS or even its screws if u don't know how to adjust
-- Don't check voltages on sensor clips or ur sensor with test lamp it might overload and kill them
-- try a reset otr hard reset before doing any of these test/adjustment processes, a reset afterwards is equally recommended
Thanks
(now i will insert pics .. took me 2 hrs to type this )


