Replacing the valve seals:
Steps taken to replace the valve seals without removing the head (Part 2: Sequence for replacing the seals once you complete the pre-sequence):
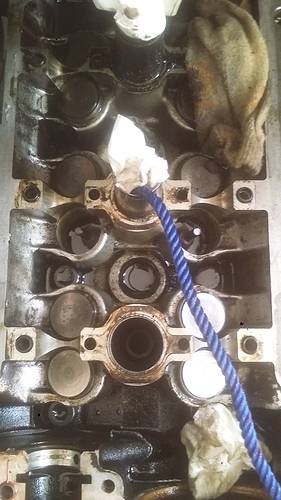
You could use the compressor method or the rope method. The rope method is more reliable! The compressor can give out at any time! The compressor tool (air valve holder) which needs to be fitted into the spark plug socket is not easily available in Pakistan.
1. Put the bolt of main pulley back on.
2. Turn the engine so that piston 1 is at BDC. You can put a long screwdriver in the spark plug hole for this purpose.
3. Insert rope. Around 1.75 to 2.5 feet of quarter-inch rope will go in. Try to stuff as much rope as you can. Use nylon rope which is more slippery. This step is most critical! If the valve falls in you cannot bring it back without removing the head!
4. Turn the engine, try to bring it to TDC. Because of the rope, it would turn only around 90 to 100 degrees and then it would go no more. As per my experience, you can leave the spanner hanging off the crankshaft center bolt, it won’t fall off neither would the engine rotate back. Now you are ready to work on the valve system.
5. Remove the valve bucket. Valve shim is firmly pressed into valve bucket and there is a small notch at the side where you can stick a screwdriver to lift it.
6. Carefully place the valve shim & valve bucket aside.
7. Remove the valve collets (catchers). Spring compressor (similar to a jaw puller) cannot fit in this engine. The cylinder head is constructed in a way so that valve bucket is totally encircled from all sides. Cable-tie method will also not work. You can press it with a Tee spanner (taami/) or use a light hammer with one of the sockets from your ratchet set. The hammer method is more effective and you can get them out the first time however it is easier to lose the catchers if they fly. Sticking a magnet to the socket could help.
8. Put the valve catchers (collets), valve spring retainer (washer) and spring together with the valve shim and bucket. Since the engine was burning oil, there could be a fair amount of sludge caked into crevices. Best to soak them in some kerosene.
9. Grip the valve stem between your thumb and index finger to see if it goes inside or not. Do not press it using your thumb! If it goes inside it won’t come back! You’ll have to remove the head – the same thing you’re avoiding! If it goes slightly inside, maybe 1 mm or so, it is not a problem. If it is going inside around 3 to 4 mm, it is not a great problem either, but you’ll have more difficulty installing the spring back! If the valve is dropping in to a greater extent, by all means STOP what you are doing, get a reliable helper to hold the valve while you adjust your rope and/or try rotating the crank to provide maximum uplift to the valve! It is entirely possible that all 4 valves go in to a different extent. Hence it will be easier to reinstall the spring on some and difficult on others.
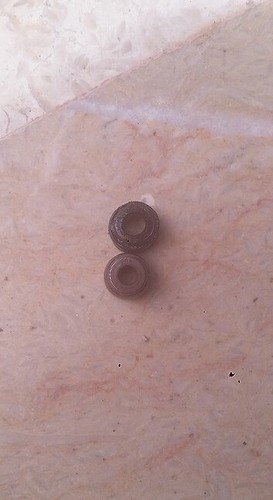
10. Now observe the existing seal to check whether the new spare parts you’ve bought would fit in there or not!
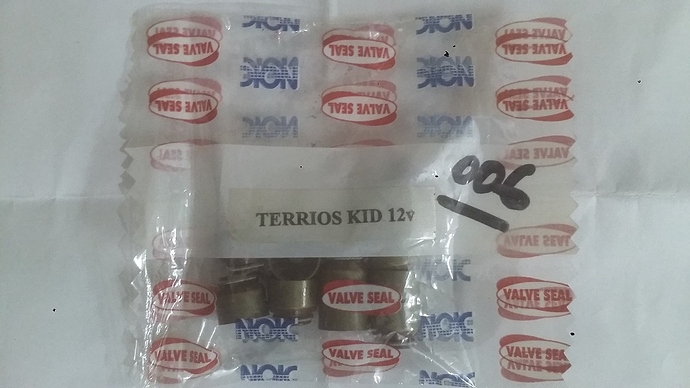
11. Next you have to remove the valve seal. There exists a valve seal removal tool but it is not easily available around however if you are willing and have enough preparation time, options are available through Daraz Global Collection. Other names are valve stem seal remover, valve seal removal pliers. Since you are DIYing this job, it can be expected that the best you have is home tools. You can definitely pull the valve seals using common pliers or needle nose pliers. My work would have stopped if this curved screwdriver hadn’t unexpectedly turned up in the toolbox. The seals were stuck with sludge and hardened so bad they didn’t come out without getting damaged.
12. The first valve seal is removed, now compare it with the new ones whether they are the same or not. Also compare the inner diameter of old and new seals.
13. Attempt fitting the new seal. Place it by hand and use light force on the T-spanner. There is a groove in the valve stem where the valve catchers sit. The sharp edge of this groove can damage the seal without you finding out! First put on a straw on the valve stem (get a variety of straws from your kitchen to try), then fit the valve seal, then remove the straw.
14. The valve seal fits into place with a very slight click. Unless you’re an experienced mechanic how would you know whether it would come loose once the engine is running? Try removing it with a very light force, if it doesn’t budge it means it is securely fitted in its intended place.
15. Wash the valve spring, washer and catchers and re-install them. Now it would take some time, effort and practice to get the correct angle AND REMEMBER that if valve catchers fly away you’re in deep trouble. Loosely place the spring, retainer and catchers in place and then cut a small piece of plastic from a thick shopping bag and put it over the arrangement before applying any force. If the catchers try to fly away, they’ll still remain in place because of the piece of polythene. Most of the time one catcher will fit into place and the other will be out of alignment. The piece from the plastic bag also helps deliver equal force to both the valve catchers. This is mainly the time when you’d maybe need to put your full weight on the valve spring and you’d be thankful for having removed the bonnet.
16. Wash the valve bucket and valve shim with kerosene and fit them in place. Mubarak you have done 1/12 of the job.
17. Do the remaining 3 valves from the same cylinder.
18. Rotate the engine to BDC and remove the rope. Mark the rope before removing it, for the next cylinder you know how much rope should go in to give proper support to all valves.
19. Rinse and repeat for the other 2 cylinders.
20. Once done, you are ready to assemble everything back.
[Old & new compared.jpg]